
Blog
How to Identify Wood Type in Antique Furniture: a Practical Guide
Identifying the wood species in antique furniture starts with the end grain, not the finish. This guide walks through the physical tests, from hardness to grain pattern, that let you tell oak from walnut and pine from mahogany before you call in a professional.
Why Wood Species Matters Before You Call an Appraiser
The wood a piece of antique furniture is made from tells you more than what it's called on a tag. It tells you where and when it was likely built, what it was worth to build, and whether the drawer front you're looking at matches the frame underneath it. Most people try to identify wood by color alone, which is the least reliable clue in the whole process. Color changes with finish, sun exposure, and age; grain structure and hardness don't.
This matters most when you're trying to decide whether a piece is worth a closer look. If you're already at the point of getting a formal opinion of value, our online furniture appraisal service walks pieces through the same fundamentals covered here, backed by a written, standards-compliant report. But before you get there, you can do a surprising amount of the legwork yourself with nothing more than a flashlight and a fingernail.
Start With the End Grain, Not the Finish
The single most reliable place to identify a wood species is the end grain: the surface exposed when the wood is cut across its growth rings. Finish, paint, and stain can disguise a top or a drawer front, but end grain rarely lies.
Real solid wood shows visible growth rings and pores in its end grain, while manufactured boards like plywood or particleboard show layered veneers or no ring structure at all, according to wood identification guidance from The Hoarde. Beyond confirming solid wood, the pore pattern itself narrows the species:
- Ring-porous woods (oak, ash): large earlywood pores form visible bands that follow the growth rings, giving the wood a rough, open texture even after sanding, per wood identification resources at Kray Custom Refinish.
- Diffuse-porous woods (walnut, cherry, maple): pores are distributed more evenly, producing a finer, more uniform grain.
- Non-porous woods (pine and other softwoods): no visible vessel structure at all, which is one reason pine dents so much more easily than hardwood.
The best places to check end grain on an antique are the drawer sides and backs, the underside of a tabletop, and the bottom of a chair or table leg, since these areas are usually unfinished and untouched by decades of polish, according to wood species research from Tree Identifier.
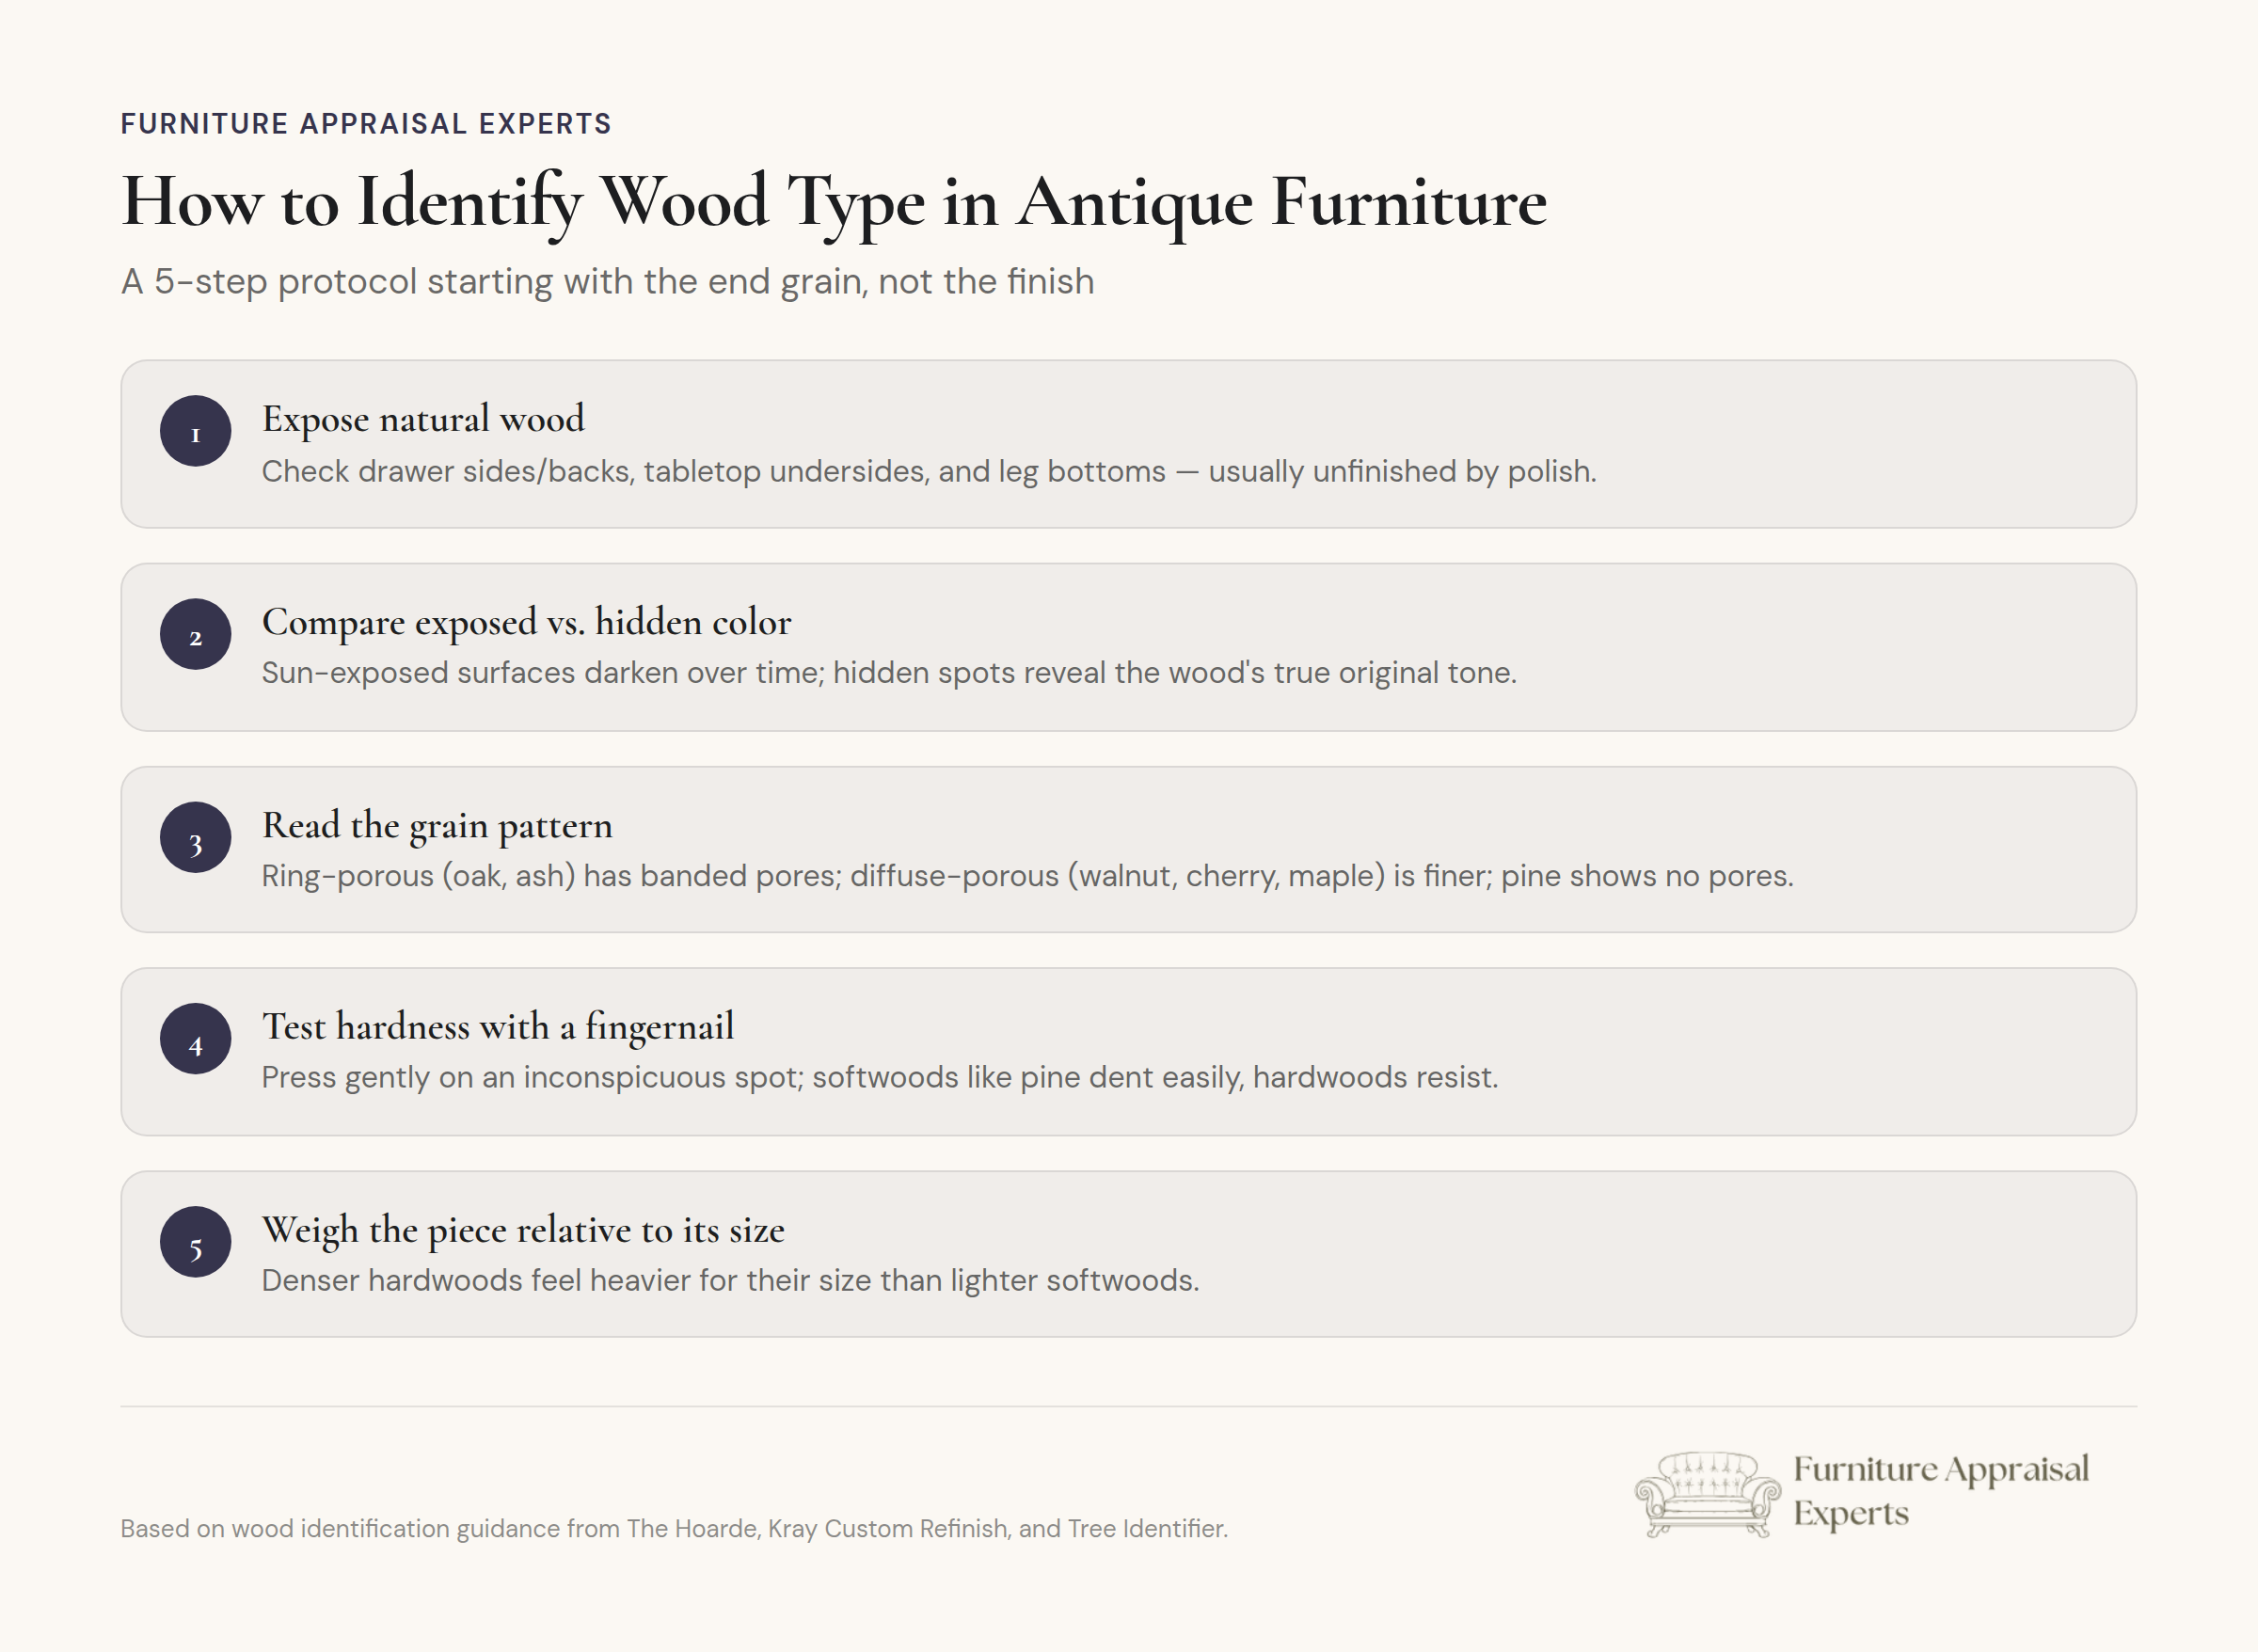
A Step-by-Step Protocol for Identifying the Wood
Skip the single-glance guess. Appraisers and experienced restorers work through a short, repeatable sequence instead, and you can follow the same order on your own piece.
- Expose natural wood. Look at hidden, unfinished areas first, such as the underside of a top or the inside of a drawer, where sunlight and stain have had the least effect.
- Compare exposed color to hidden color. Aging darkens most woods unevenly. Walnut in particular darkens noticeably with light exposure, so a hidden panel will read lighter than an exposed surface on the same piece, per The Hoarde's wood identification guide.
- Read the grain pattern. Prominent, open lines with visible pores point toward oak or ash. A moderate, flowing grain with a more even texture suggests walnut or cherry.
- Test hardness with a fingernail. Press gently into a hidden spot. Hard species like maple and oak leave little or no mark, while pine and poplar dent easily.
- Weigh the piece relative to its size. Denser species feel noticeably heavier than their volume suggests, which is a fast way to separate a heavy oak or walnut carcass from a lighter pine or poplar one, according to wood identification and dating guidance from Round Top Finder.
Pro tip: Do steps 1 through 5 in order, on the same hidden spot, before you form an opinion. Jumping straight to color is how most misidentifications happen.
Species-by-Species Field Guide
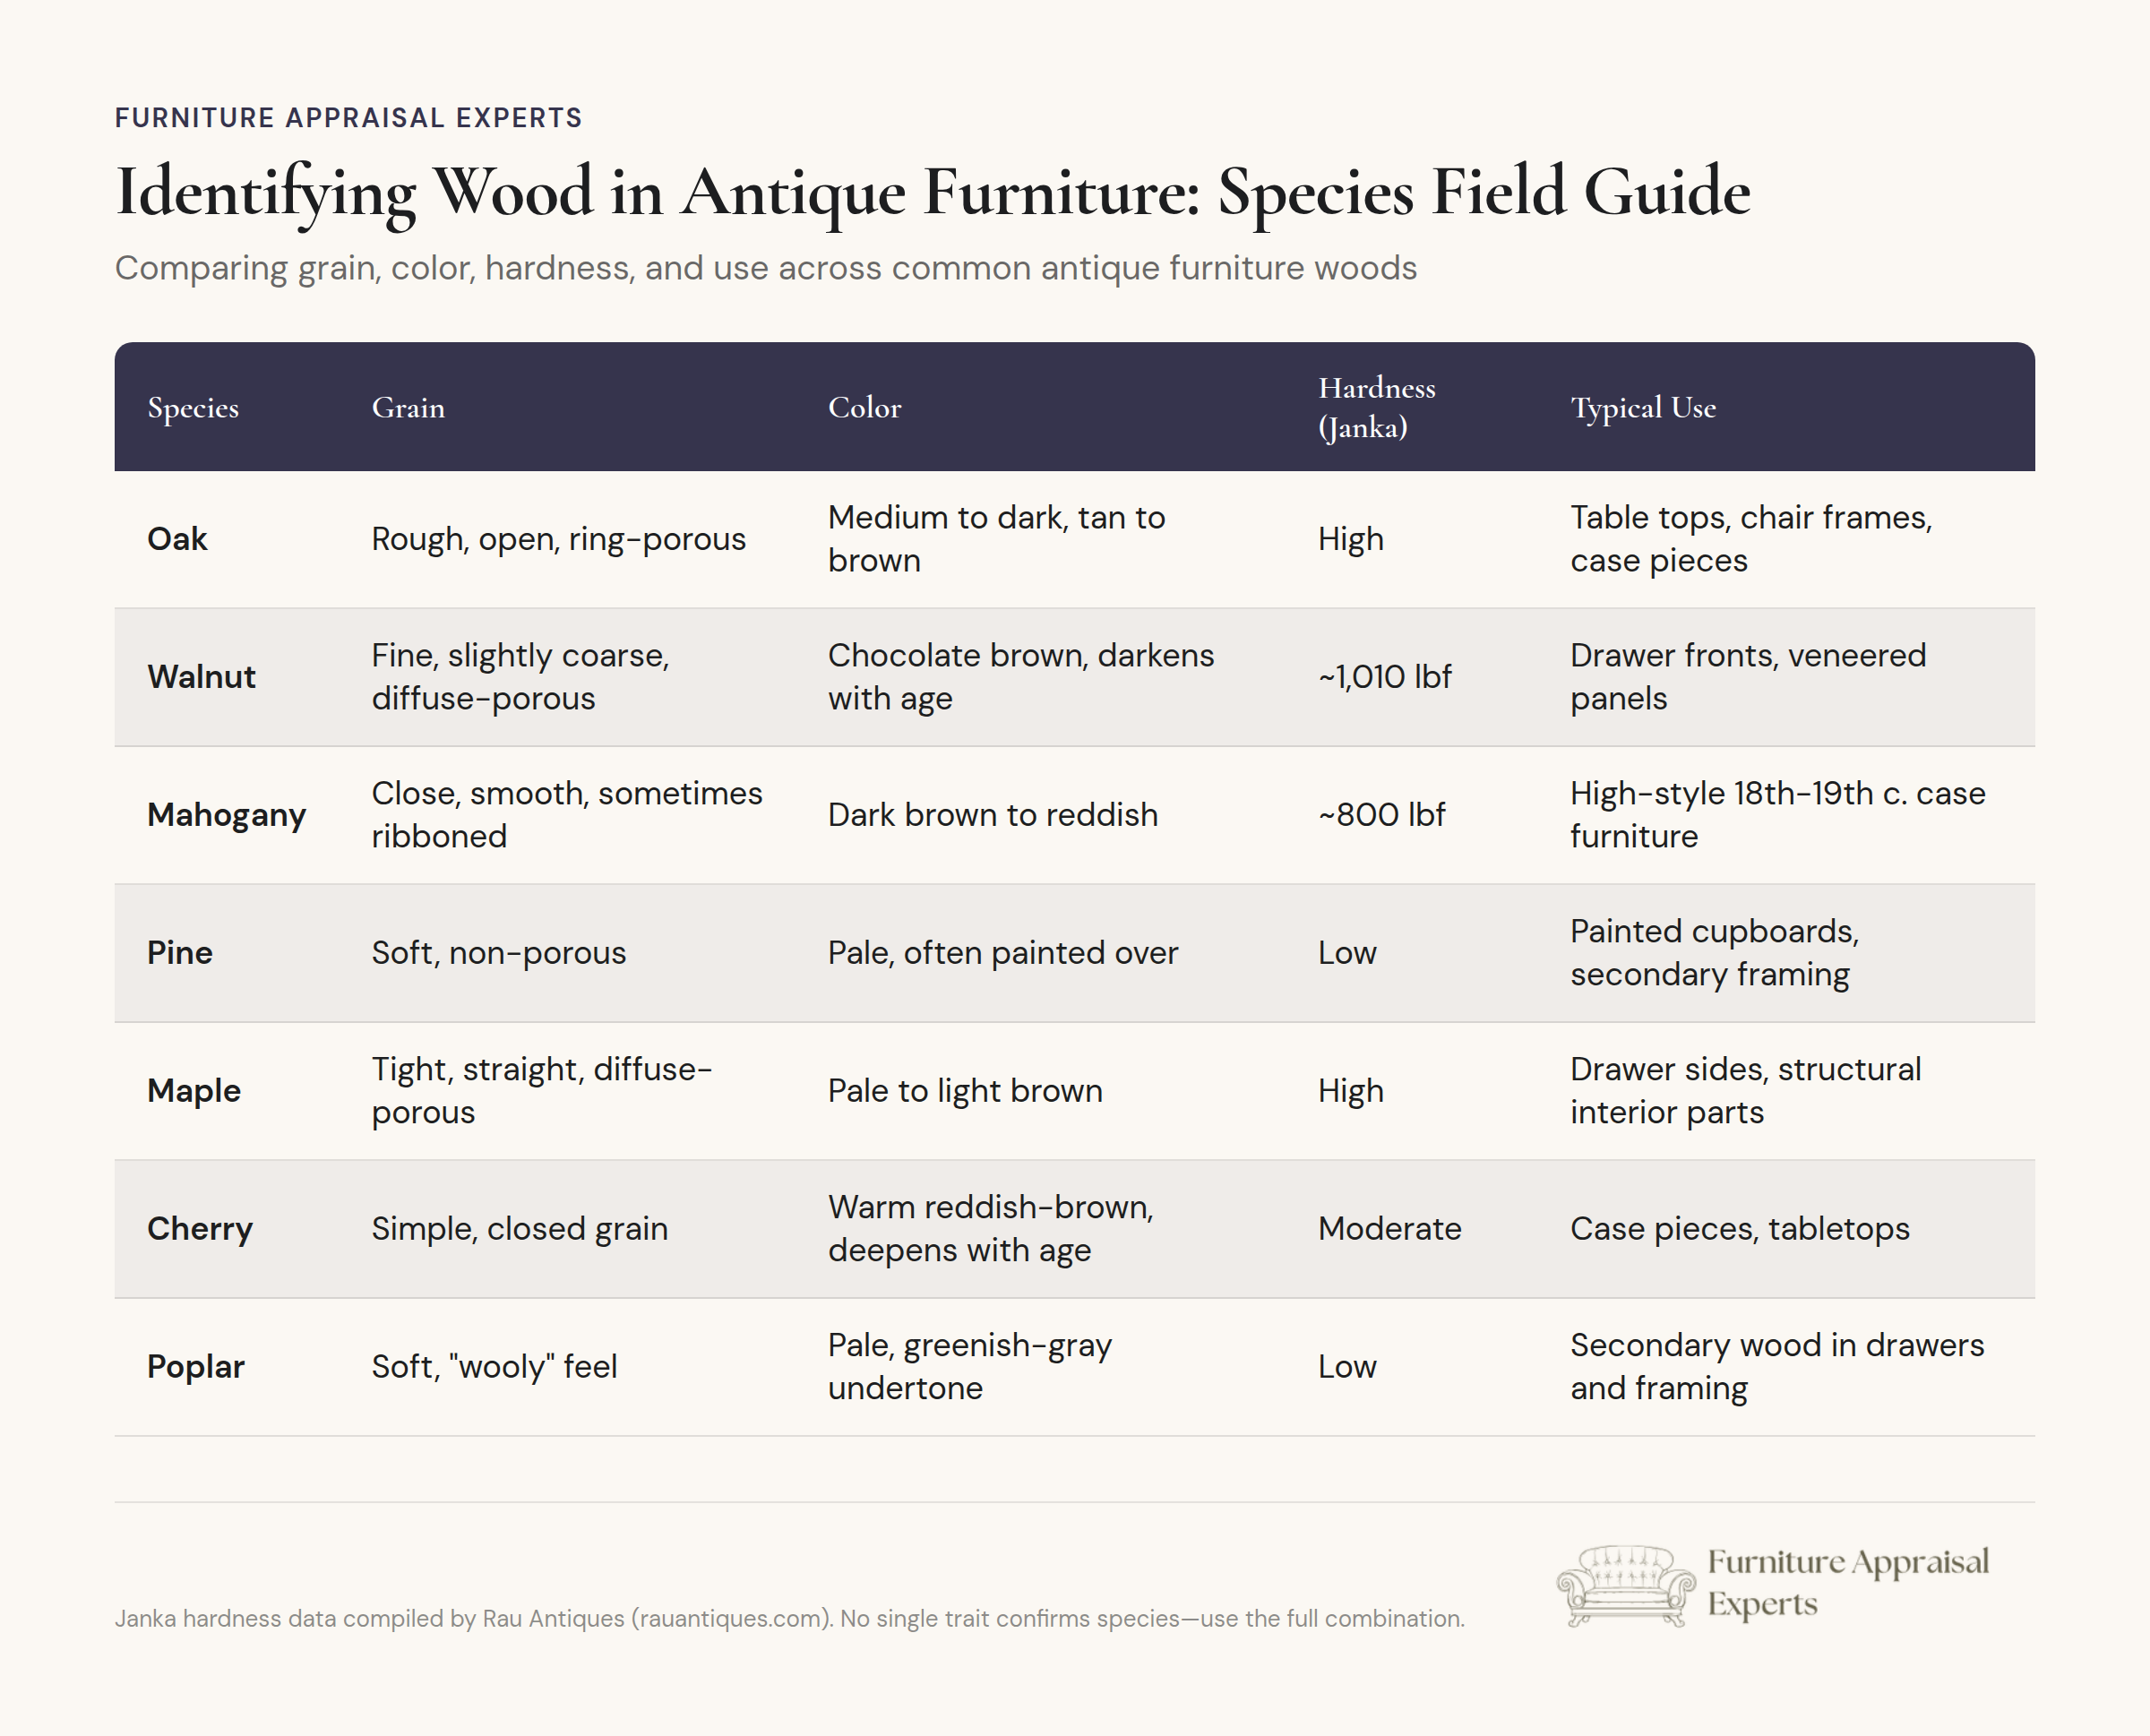
Once you've worked through the protocol, match what you found against the documented traits of the woods most commonly used in antique furniture. No single trait is proof on its own; the combination is what confirms a species.
| Species | Grain | Color | Hardness (Janka, lbf) | Typical Use |
|---|---|---|---|---|
| Oak | Rough, open, ring-porous | Medium to dark, tan to brown | High | Table tops, chair frames, case pieces |
| Walnut | Fine, slightly coarse, diffuse-porous | Chocolate brown, darkens with age | ~1,010 | Drawer fronts, veneered panels |
| Mahogany | Close, smooth, sometimes ribboned | Dark brown to reddish | ~800 | High-style 18th-19th century case furniture |
| Pine | Soft, non-porous | Pale, often painted over | Low | Painted cupboards, secondary framing |
| Maple | Tight, straight, diffuse-porous | Pale to light brown | High | Drawer sides, structural interior parts |
| Cherry | Simple, closed grain | Warm reddish-brown, deepens with age | Moderate | Case pieces, tabletops |
| Poplar | Soft, "wooly" feel | Pale, greenish-gray undertone | Low | Secondary wood in drawers and framing |
These Janka values, which measure resistance to denting under a set force, come from wood-hardness data compiled by Rau Antiques. Satinwood, used on higher-end Regency and English pieces, sits far above all of these at roughly 2,620 lbf, which is part of why it turns up as banding and veneer rather than solid structural wood.
Primary Wood vs Secondary Wood: What Construction Reveals
A piece described as "a walnut chest" is rarely walnut all the way through, and that's normal, not a red flag. Furniture makers used a primary wood on visible surfaces (tops, drawer fronts, door faces) and a cheaper secondary wood on hidden structural parts (drawer sides, bottoms, back panels). Walnut fronts paired with poplar or pine sides is standard, well-documented American construction practice, not evidence of a later repair.
This distinction also helps with dating. Flat-head slotted screws point to construction before 1930, while Phillips-head screws indicate work done after 1930. Hand-cut dovetails, saw marks, and the identity of the secondary wood are typically read together rather than in isolation, and when all three point to the same era, that's a strong sign the dating is reliable, per construction and dating research from Round Top Finder. If you want a deeper walkthrough of how appraisers weigh construction evidence like this alongside wood species, our guide on how furniture appraisal works covers the full process from inspection to report.
Watch out: An all-walnut drawer on a piece where you'd expect a poplar secondary wood isn't automatically a bonus. It can just as easily mean a later replacement drawer, which is worth flagging before you assume the whole case is original.
When Wood Identification Isn't Enough
Grain, hardness, and construction get you most of the way to a confident species identification, but they don't tell you what the piece is worth, and they won't hold up as documentation for insurance, estate, or donation purposes on their own. That's where a credentialed appraisal comes in.
Our appraisers hold credentials with organizations such as the International Society of Appraisers (ISA), the American Society of Appraisers (ASA), and the Appraisers Association of America (AAA), and every furniture report we prepare is done in accordance with USPAP (the Uniform Standards of Professional Appraisal Practice). A standard furniture appraisal is quoted as a fixed fee starting around $195, with IRS-qualified reports starting around $295; more complex pieces, larger collections, or in-depth research into maker attribution typically run $395 to $2,200, and highly complex or historically significant pieces can run $1,600 to $3,500 or more. The fee is always set by the scope of the assignment, the number of pieces, and the depth of research required, never by what the piece turns out to be worth.
Key takeaway: Use the end grain, the hardness test, and the primary/secondary wood pattern to get a confident read on species before you spend money on a formal opinion. If the piece still looks promising after that, or you're staring at a maker's label you can't confirm, that's exactly the point where a written appraisal earns its cost. If you're not sure your piece clears that bar yet, our list of five signs of a valuable antique is a fast gut check before you go further. See our appraisers' credentials and approach, or browse more valuation questions we've answered.